

Wednesday, 7 July 2010
Extreme Quality Control
Today I shrunk myself and had a walk around the body of the sonic screwdriver in order to examine each and every crackle:

Tuesday, 6 July 2010
Eleventh for 11....Eleventh Doctor Sonic Screwdriver Update

http://celestialtoystore.blogspot.com/2010/05/eleventh-doctor-sonic.html
You will also recall that my Tweets around that period detailed the headfuck I went through trying to reverse engineer this thing. Up until that point everything I had seen about this prop including it's appearances on chat shows and in public lead me to believe that this prop was in no way replicable as a consumer-grade replica. It simply is not engineered enough and will break at the slightest hint of abuse. I understand that Matt Smith broke this prop countless times through 'flicking' it open. The prop, as I understand it, is just not designed to withstand this kind of continual abuse. On-set, these props have a full time minder: a big chap from the art department whose raison d'etre is to be the custodian of this prop and make running repairs and make sure that the thing is in tip top shape for every take:

Now obviously our replica - in fact, NO replica of this prop by anyone - can be 100% screen accurate in construction and materials to the prop without it coming with the services of the gentleman above. And whilst it may tickle your funny bone to have a chap like that tagging along with spare parts, lube and a real screwdriver everytime you take your 11th sonic for a walk, the novelty will, I assure you, quite quickly wear very thin indeed. Indeed, having seen Season 5 in its entirety, I have come to the disappointing conclusion that this prop is not quite the high quality piece it first appeared.
Well for the best part of the past three months I have agonised over design of this and I have studied every screenshot and pic of the prop available together with the remarkably good CO toy version and it does appear that this prop has some serious design and construction flaws and that these flaws are not as apparent onscreen due to the existence of multiple props, possibly 2 or 3, that are rotated to give the illusion of a single prop.
The good news is that I have figured out exactly how the prop is constructed, the limitations of the design, the flaws and the precise dimensions, in as much as can be done when there are multiple props that appear to look substatially different from each other. What this means is that I will be totally re-engineering the prop to eliminated or reduce the design flaws, keep the overall dimensions aand proportions screen accurate, yet make a durable consumer grade prop replica that improves on the prop but still retains the same outward aesthetics. Basically, I'm going to make a screen accurate prop only better :-)
A lot of people have often asked the methodology I use to create near perfect replicas from only visual material and the secret is that yes, I do have a secret methodology that draws upon several disciplines underlined with common sense, deduction and logic. There's also a healthy dose of savantism at work too. The truth of the matter is that the method, however powerful, is unimportant and is utter secondary to the end result and QED, will result in some pretty amazing results as you will see. Blueprints have been made, the CAD model is being built and thanks to those of you that have sent in reference material, I am in a position to create what I feel could be the finest replica of its kind. I shall be further working on the design and blueprints over the coming months as there are several things that need to be sourced. I shall be using copper look anodised aluminium, Corian, artificial jade, raw aluminium, brass and leather for my build and will be looking at building my first prototype as soon as I have some spare time, possibly after SDCC in a couple of weeks.
Monday, 5 July 2010
Tennant Sonic Videos Up
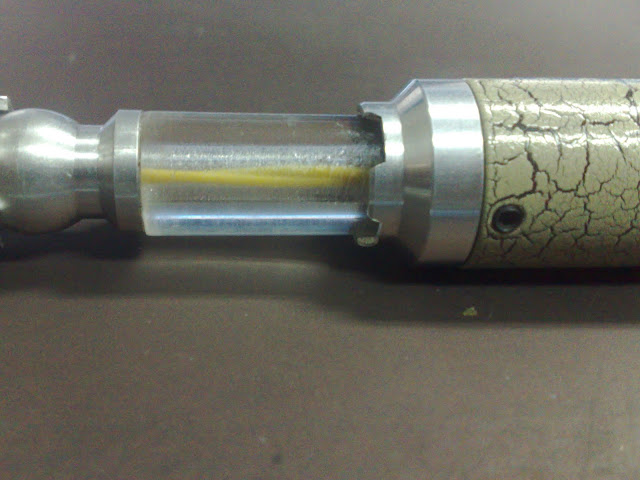
I have been bugged, pestered and cajoled and I've finally had a few moments to relent and film some quick and dirty vids of the Tennant sonic for you. Please note that the color is GREY. It looks a bit yellowish as the lights in my office at 2am are fluorescent and very yellow and the white balance on my Nokia does not handle fluorescent light too well. You'll note I have made a small adjustment to the acrylic neck and deliberately made the bore channel sloppy and scratchy with no oil. On camera it now looks identical to the Tennant neck.

Now let me get back to work you bunch of demanding slave drivers.
Sunday, 27 June 2010
Ok, I'm going to take this slow.....
Phez made this observation about my prop:
"Like why is the head connected to the slide totally different than the screen used ones? Even the plastic background piece this is based on is not like that."
Now I like to think my grasp of the English language is far from tenuous but even a wordsmith of my calibre cannot decipher this garbled mess.
However, Phez has made himself clearer.
He subsequently posted this:
"You guys I am not trying to debunk the guys props. He did a great job on it period. I am dropping the photo proof question because it just does not matter. Here is what I am talking about. The tube that goes up the center of the headpiece one size all the way through. In the photo (and all of them I have seen) all around where the tube goes into the tip (and the body end of the head) is a flat surface. If you look at the replica on the first page of this thread you can see the rings where two sides of that pin are bigger where they screw in from the center post on the bottom and go into the tip of the unit.

It is a small detail and was probably just another design decision no doubt like the slider was so you could replace the LED or something. Not a big deal."
It's a decent enough question which I have covered previously, but I'll cover it again with much the same patience that a remedial kid needs.
Ok. The construction on mine is based on the Penny Howarth made hero prop. The prop picture above is the Aztec 'static' prop (it actually wasn't that static, it can slide in and out).
In any case, the way my prop fits together is that the LED sits in an LED holder and the head cage slides on and screws into the ball. This featured a circular join at the base of the head recess below the centre pipe.
Look here at a shot of the Tennant prop from the Visual Dictionary:


The pencil is pointing to the join I refer to. There is also a join on the upper part of the inner recess too. This is where the ball join screws into the emitter head cage. Here is the head without the emitter cage screwed in showing the LED holder:

Mr Jedibugs also reminded me of something else that will confirm I am correct in my observations and engineering:

This picture clearly shows the large upper aperture where an LED holder, such as on mine will fit into. This aperture is clearly larger than the diameter of the central pipe.
Ok, some caveats here. I do not know if ALL the props including the Tennant one had this construction (but based on the above DK pic I know at least one did). I suspect that the hero props do as there were only 4 to 6 heads (including the 3 Aztec heads that I know DO NOT have this construction) ever made that were constantly recycled and mounted onto different bodies. I also cannot say 100% this construction is actually correct as I never took apart the prop. I can tell you that externally, my replica looks identical with the correct joins, the rest I engineered using common sense principles of design, including the LED holder.
For next week's lesson Mr Phez, please bring along some chewing gum. I'll teach you how to chew it.
Edit: Einstein Phez has tried to argue his case by presenting the following two pictures as proof of the absence of the LED holder:


Firstly, the top picture can be discounted as it is the Aztec prop. The second pic is the prop I had access to.
Let me state that the tolerance between the LED holder and the head cage is tiny. Thousandths of a millimeter. The seam is virtually invisible and that close tolerance has practical problems such as galling and thermal expansion (which I solved by making the tolerance larger). Having stated that, let's look at the pics.
Here's a closeup of the head of the second pic:

Can't see anything? Look a bit closer:

See it now? If not, here's the same pic with contrast turned up:


See what I mean? Look and all shall be revealed. I think this what you call, getting 'pwned', lolololol.
Friday, 25 June 2010
Thursday, 24 June 2010
Tennant Sonic Ready for lift-off
After a protracted development I've finally finished my Tennant sonic. Here's some quick and dirty shots to whet your appetite. I apologise for the quality of the shots but it's just gone midnight here and I've got no real 'white' light source except my fluorescent desk lamp. I'll take better shots when the sun comes up but for right now, these should give you an idea as to what I've done:


Here's the 'DK Limited Edition' which looks like a grubby version of the Grey one above. I've reduced the yellowness to make this version closer to the grey but still retained enough yellow to differentiate it, ultimately, it's still a matter of aethetics as they both look sensational, if I do say so myself:


UPDATE: I'm canning the yellow sonic. Don't think it's going to fly. Stripping the yellow body down tomorrow.
I'm doing some final tweaks on the crackle pattern this weekend so will be down at the paint workshop trying to reduce the capillary like nature and make the cracks more polygonal: geometric as opposed to organic, as it were. They will be ready for ordering in the next 24 hours, when I update the store and shall be shipping next week.
Allons y.
Saturday, 19 June 2010
Peter Davison & Colin Baker shirts sneak preview
Just had a call from my buddy at the clothing factory. They have just finished making these:

He's dropping them over to me tomorrow so should have some more pics for you soon. The correct original manufacturers labels are being made and will be stitched in next week but these are about as correct as you can get. They are 'museum quality' and have been patterned off original screen worn shirts. (Sorry about the color in the pics, the actual shirts have been color matched using a special Pantone colorimeter on the original costumes).
Price will be around the £100 mark. Only making a handful of these so get your orders/interest registered quick.
Edit: Just noticed a small snafu on the Davison shirt. Need to get a couple of bit reversed. Correction should be ready in a day or two ;-)
Subscribe to:
Posts (Atom)
Once a cunt, always a cunt
Retirement can be both a bane and a boon. In many ways I'm enjoying not having to deal with the toxic fuckery that is Doctor Who fandom ...

-
.jpg) Well, here we are—winter has turned to spring, and the release of the Celestial Toystore Reference Edition Sonic Screwdriver is getting clos...
Well, here we are—winter has turned to spring, and the release of the Celestial Toystore Reference Edition Sonic Screwdriver is getting clos... -
Hello everybody! 2025 is now well underway and has already been a shock to all of our systems - Donald Trump became president again, China s...
-
 Well hello....it's been a while hasn't it? By my reckoning it's been over a decade since I last posted here. Hasn't time flo...